
Tired of important emails landing in your Shaw spam folder? This guide provides simple solutions to keep your inbox clean and ensure you never miss crucial messages. Learn how to adjust your Shaw Webmail settings to effectively whitelist senders and manage spam filtering.
Here are the most effective ways to prevent emails from going to your Shaw Webmail spam folder:
- Add senders to your Trusted Addresses/Domains list (Recommended)
- Adjust your overall spam filter settings
- Create custom email filters
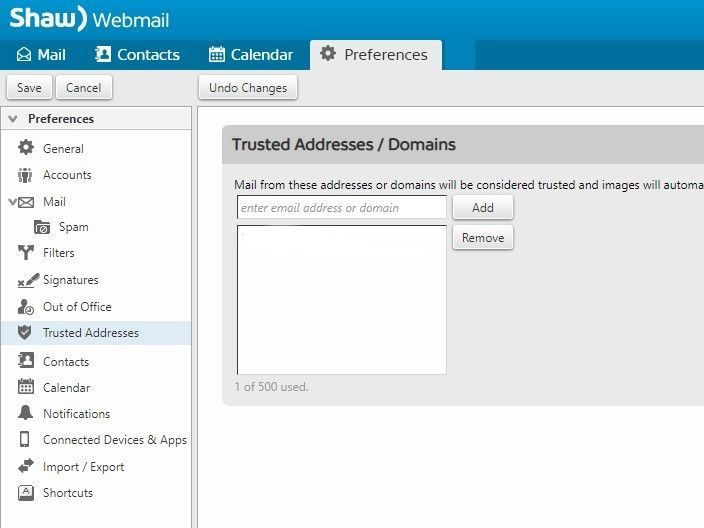
How to Add Senders to Trusted Addresses in Shaw Webmail
This is often the easiest and most direct way to ensure emails from specific senders always reach your inbox. Adding an email address or domain (e.g., example.com) to your Shaw Webmail trusted list ensures their messages bypass the spam filter.
- Go to Shaw Webmail in your web browser.
- Select Preferences in the toolbar at the top of your Inbox.
- Select Trusted Addresses from the menu on the left side of the screen.
- Under Trusted Addresses / Domains, enter the email address or domain you want to whitelist.
- Select Add.
- Select Save.
How to Create Email Filters in Shaw Webmail
Email filters provide more granular control over how your messages are handled. You can create rules to ensure messages from specific senders are never sent to your spam folder.
- Go to Shaw Webmail in your web browser.
- Log in using your Shaw email address and password.
- Select Preferences, then Filters.
- Select Incoming Message Filters.
- Select Create Filter. The Add Filter window will appear.
- Enter a descriptive name for the filter.
- In the first dropdown, select Any.
- In the second dropdown, select From.
- In the middle dropdown, select matches exactly (Note: To whitelist an entire domain, select contains).
- In the field on the right, enter the email address you want to whitelist.
- To whitelist multiple email addresses, select the + button and repeat steps 8-10.
- Under Perform the following actions, select Keep in inbox.
- Select OK.
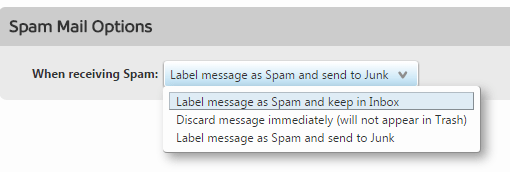
How to Change Your Spam Filter Setting in Shaw Webmail
This option is useful if you find that many legitimate emails are being marked as spam. However, be aware that lowering your spam filter settings will likely result in more spam reaching your inbox.
- Go to Shaw Webmail in your web browser.
- Log in using your Shaw email address and password.
- Select Preferences in the toolbar at the top of your Inbox.
- Select Spam from the menu on the left.
- Choose Label messages as spam and leaving them in your inbox to have suspected Spam delivered to your inbox.
- Select Save.
You can always revert to your previous spam settings if you find your inbox is getting too much spam.
By taking these steps, you can better manage your Shaw Webmail spam filter and ensure important emails always reach your inbox. For further assistance, refer to Shaw’s official support resources.
Photo by Denisse Leon on Unsplash
4 replies on “How to whitelist in Shaw Webmail (updated for 2025)”
Further to my comment about your broken search tool, I suggest that until it is fixed, you remove the search tool from user view, and put a note stating that it is temporarily unavailable, and that scrolling should be used instead.
Please add q.com, which I think used to be Qwest/CenturyLink
Thanks
(1) Provider search tool broken
The provider search tool leads to truncated introductions of each provider instead of the full entry, which typically starts with an image. I have told my newsletter
recipients to scroll for their mail app’s icon and not use the search tool.
Thanks for the heads up. I’ll take care of this